Tuesday, September 14, 2010

How to Migrate a Visual SourceSafe Database to Subversion

The software tools involved in this migration are:

  • Collabnet Subversion Edge 1.2 – the subversion server
  • TortoiseSVN 1.6.10 – a subversion client
  • VSS2SVN 0.2.0  - the Visual SourceSafe to Subversion conversion tool
  • Visual SourceSafe 2005 – the VSS software

    I used Collabnet Subversion Edge 1.2 as my subversion server.  It is easy to install and configure and it is free.  This post assumes you can handle the server setup yourself. First we must create a subversion repository to hold the converted VSS database. Open the web interface to Collabnet Subversion (http://your-server-here:3343) and click the Repositories tab.  Click the ‘New Repository’ link.  This will ask you to provide a name for the repository and if you would like to use the standard trunk/branches/tags structure.

    image

    We need to set up a pre-revision hook in the new repository for the conversion tool to successfully save your source code history.  To do this, go to your repository folder in the file system and find the hooks directory.  It is a sub-folder of your newly created repository folder.  In the hooks directory and several tmpl files. These are hook templates.  To get a hook to execute you must place an executable file (exe, script, batch file, etc…) in the hooks folder with the exact name of the hook.  For our purposes, create a file named pre-revprop-change.bat and in this file place the line: exit /b 0.

    image  

    We are done on the server. 

    You most likely have Visual SourceSafe installed on your client computer.  After all this is what you have been using for source control.  If not, you must install and configure Visual SourceSafe 2005 on your client computer.  Next, Install TortoiseSVN on your client computer.  Using TortoiseSVN pull down your empty subversion repository that we created earlier.  Any temp folder will do.  We just need to have TortoiseSVN to have a connection to the subversion server so that the VSS2SVN tool will work properly.

    You may want to copy your entire VSS database to your local computer for the migration.  First make sure that no user has any checked out items in the VSS database.  Next copy the entire VSS database to your local computer.  The conversion tool may take several hours if you have a large database.  The nice thing is that the VSS2SVN tool will allow you to convert one project at a time.

    Download and run the VSS2SVN tool.  If you are on a 64 bit verison of Windows you will need to download the source code for VSS2SVN.  Open the solution in Visual Studio 2008, add an x86 configuration to the project and rebuild.  By default it is built for any CPU, but VSS only provides x86 versions of its automation DLL.  VSS2SVN uses this automation DLL so we must have a 32 bit (x86) build of the VSS2SVN tool.

    The VSS2SVN tool is under-documented.  First you need to set the VSS Parameters.  This includes: Path to Scrsafe.ini, User name, Password, and VSS project to use.  Browse to your copy of your VSS databases srcsafe.ini folder, enter your VSS user name and password, enter the path to the project to be converted and then click the ‘Find file in source safe’ button.

    image


    Click ‘OK’ to dismiss this dialog and then the General and SVN parameters become available to be edited.  Set the working directory to something like %TEMP% and check the ‘Delete temporary files when done’ button.  Fill out the ‘SVN path to use’ with the path to the trunk of the repository that you created at the beginning of this blog post and click the ‘Migrate to subversion’ button.  This may take a long time!  It depends on the size of the project and the number of revisions that is has.  Your SourceSafe history will be converted to subversion revisions.

    When this is done you can open the web interface to Collabnet Subversion and browse through your source repository.  Collabnet also provides Windows command line subversion tools, as well as Visual Studio and Eclipse plug-ins.

  • Friday, September 10, 2010

    VC++ Directories in Visual Studio 2010

    The default include, lib, etc… directories in Visual Studio 2010 are no longer project dependent.  You can, if you need to, over-ride the settings on a per project basis.  The directory settings are stored in the following location:

    %USERPROFILE%\AppData\Local\Microsoft\MSBuild\v4.0

    In this directory you will find the files:  Microsoft.Cpp.Win32.user.props, Microsoft.Cpp.x64.user.props, and Microsoft.Itanium.user.props  (the last two only if you have installed the x64 tools).

    These files are UTF-8 encoded XML files.  In them you can define your include, lib, executable, reference, and source paths.  You can also define excluded directories.  These settings become the defaults for all C++ projects.  Of course the Win32 file is for 32 bit Windows builds, while the x64 file is for 64 bit AMD64 builds.  I don’t know anyone that has an Itanium computer so I won’t even discuss those.

    This is great now that you don’t have to search and replace through every .vcproj file (I know .vcxproj file in 2010) every time you want to change an include path.  Just change the paths in these files and all projects are updated.

    Teams:
    You can store your Microsoft.Cpp.xxx.user.props files in source control.  Each team member can pull down the required files so that everyone is on the same path (bad pun, couldn’t resist).

    Friday, September 3, 2010

    My Thanks to the Profiler

    I recently had an issue at work with one of our kernel mode file system filters for Windows.   The CPU was spending way too much time executing our drivers code.  I ran the kernrate sampling profiler tool from the Windows Driver Kit on our driver to see what code was taking so long to execute.  The profiler revealed that over 50% of the time that our driver was executing in a function named RtlUnicodeStStri.  This is a function that I wrote that is similar to the strstr function in the C standard library with the exception that it is case-insensitive and it works on UNICODE_STRING structures. In the Windows kernel, UNICODE_STRING structures are used in place of character arrays.  The structure is defined like this:

    typedef struct _UNICODE_STRING
    {
        USHORT Length;
        USHORT MaximumLength;
        PWCH Buffer;
    } UNICODE_STRING, *PUNICODE_STRING;   


    Windows includes type definitions of USHORT as unsigned short and PWCH as wchar_t*. When using UNICODE_STRING structures you have the length of the string (in bytes) and the maximum length (i.e. the buffer size) of the string (in bytes).  This provides many benefits: you can safely detect if any operation will overrun your string buffer, you can compare lengths before comparing strings, etc…  The strings stored in the Buffer member of the UNICODE_STRING structure are not guaranteed to be NULL terminated and many times they are not.  Thus you can not use the standard C library functions on the Buffer member.
    Although the Windows kernel internally uses the UNICODE_STRING, there is not a very comprehensive library for handling UNICODE_STRINGS (The string handling functions are in the Rtl library).  This causes many developers like myself to write functions like RtlUnicodeStrStri.  Below is the original version of RtlUnicodeStrStri that I had written. 
     1 __drv_maxIRQL(APC_LEVEL)
     2 NTSTATUS
     3 RtlUnicodeStrStri(
     4     __in PCUNICODE_STRING  Str,
     5     __in PCUNICODE_STRING  SubStr,
     6     __out_opt PUNICODE_STRING  Result,
     7     __out_opt int* MatchStartIndex
     8     )
     9 {
    10     USHORT l1=0, l2=0;
    11     USHORT start = 0;
    12     
    13     //  Translate all counts to character counts.
    14     const USHORT StrCharLen = Str->Length / sizeof(WCHAR);
    15     const USHORT SubStrCharLen = SubStr->Length / sizeof(WCHAR);
    16 
    17     ASSERT_VALID_STRING(Str);
    18     ASSERT_VALID_STRING(SubStr);
    19     
    20     while (start < StrCharLen)
    21     {
    22         for (l1=start,l2=0; l1<StrCharLen && l2<SubStrCharLen; ++l1, ++l2)
    23         {
    24             if (RtlUpcaseUnicodeChar(Str->Buffer[l1]) != 
    25                 RtlUpcaseUnicodeChar(SubStr->Buffer[l2]))
    26             {
    27                 break;
    28             }
    29         }
    30     }
    31 
    32     //    other code removed...
    33 
    34 } // RtlUnicodeStrStri

    At first glance, I thought that the function was fairly straightforward.  Then I noticed one particular optimization that should have been made.  In the worst case, when the sub-string is not present, the algorithm continues to look through the entire source string even when the remaining length of the source string is too short to hold the sub-string.  This is an optimization that can not be made in the C version of strstr because you have no idea in advance how long the source string.  The full code is given below.


     1 __drv_maxIRQL(APC_LEVEL)
     2 NTSTATUS
     3 RtlUnicodeStrStri(
     4     __in PCUNICODE_STRING  Str,
     5     __in PCUNICODE_STRING  SubStr,
     6     __out_opt PUNICODE_STRING  Result,
     7     __out_opt int* MatchStartIndex
     8     )
     9 /*++
    10 
    11 Routine Description:
    12 
    13     This routine search Str for the first occurrence of the string SubStr
    14     in a case insensitive manner.  If Result is provided and the search is
    15     successful, it will be filled in with the string starting at the matched 
    16     sub-string.
    17 
    18 Arguments:
    19 
    20     Str - The string to search.
    21     
    22     SubStr - The string to search for.
    23 
    24     Result - Result of the search starting at the sub-string and 
    25              continuing through the rest of Str. This structure 
    26              justs points to the string in Str.
    27 
    28     MatchStartIndex - The starting index within Str at which SubStr
    29                       appears.                                   
    30 
    31 Return Value:
    32 
    33     STATUS_SUCCESS if SubStr was found in Str, 
    34     STATUS_OBJECT_NAME_NOT_FOUND otherwise.
    35 
    36 Unit test:
    37     
    38     UnitTest4() via RtlWStrStri
    39 
    40 --*/
    41 {
    42     USHORT l1=0, l2=0;
    43     USHORT start = 0;
    44     
    45     //  Translate all counts to character counts.
    46     const USHORT StrCharLen = Str->Length / sizeof(WCHAR);
    47     const USHORT SubStrCharLen = SubStr->Length / sizeof(WCHAR);
    48 
    49     ASSERT_VALID_STRING(Str);
    50     ASSERT_VALID_STRING(SubStr);
    51     
    52     // Run the loop while the length of the sub-string (SubStr) is less
    53     // than the remaining length of the input string being searched (Str). 
    54     while (start < StrCharLen && (SubStrCharLen <= (StrCharLen - start)))
    55     {
    56         for (l1=start,l2=0; l1<StrCharLen && l2<SubStrCharLen; ++l1, ++l2)
    57         {
    58             if (RtlUpcaseUnicodeChar(Str->Buffer[l1]) != 
    59                 RtlUpcaseUnicodeChar(SubStr->Buffer[l2]))
    60             {
    61                 break;
    62             }
    63         }
    64 
    65         if (l2 == SubStrCharLen)
    66         {
    67             if (ARGUMENT_PRESENT(Result))
    68             {
    69                 //  Translate start back to byte count.
    70                 l1 = start * sizeof(WCHAR);
    71 
    72                 Result->Length = Str->Length - l1;
    73                 Result->MaximumLength = Str->MaximumLength - l1;
    74                 Result->Buffer = &Str->Buffer[start];
    75             }
    76 
    77             if (ARGUMENT_PRESENT(MatchStartIndex))
    78             {
    79                 *MatchStartIndex = start;
    80             }
    81 
    82             return STATUS_SUCCESS;
    83         }
    84 
    85         ++start;
    86     }
    87 
    88     return STATUS_OBJECT_NAME_NOT_FOUND;
    89 
    90 } // RtlUnicodeStrStri

    This optimization dropped our drivers execution time dramatically, to an acceptable level, though RtlUnicodeStrStri was still responsible for about %30 of our drivers execution time.  I tried to optimize the calls to RtlUpcaseUnicodeChar (A Windows API) by doing quick translations for English ASCII codes (including ignoring chars that were already up-cased).  It turns out that RtlUpcaseUnicodeChar is very very good and any optimization attempt I made just made the driver’s execution time worse.

    It turns out that our programmer’s (including myself) just got lazy and overused RtlUnicodeStrStri.  I mean, why parse a string and do a compare on the part of interest when you can just call RtlUnicodeStrStri?  So I wrote many more UNICODE_STRING handling functions like RtlStringEndsWithSuffix that can replace many calls to RtlUnicodeStrStri and more clearly capture the programmer’s intention in the code.

    Wednesday, September 1, 2010

    Porting C# Code to IronPython, an Example

    Lately, I have been reading Jeff Richter’s book “CLR via C#, 3rd Edition.”  I have read several of Jeff Richter’s programming books over the years, mostly his series of books on programming Windows with C/C++.  I have always liked his writing.  He is not afraid to say that Microsoft has made a mistake by providing a Windows API or technology that is substandard.  He won’t just complain about it, no, he will go on to say how he would have done it (and provide code).  Don’t get me wrong here, he also points out many things that Microsoft has done well.  I just respect the fact that he is not afraid to provide a dissenting opinion.

    In chapter 26 of “CLR via C#, 3rd, Ed.,” “Compute-Bound Asynchronous Operations”  there is a cool example of using Task objects from the System.Threading.Task namespace.  This small example demonstrates several features of Task objects including using a TaskScheduler to sync back to the GUI thread, cancelling a task, and using a continuation task to execute another action after a task completes.  The sample uses a contrived example of a compute bound function named Sum that keeps the CPU busy for a while by adding integers from 0 through some number n.  This program is a simple Windows Forms application.  I have modified it slightly to use a button instead of just detecting a mouse click on the form.  Below is the form and the C# code that appeared in the book (modified by me).
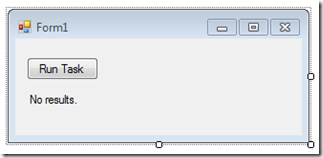
      form

     1 using System;
    2 using System.Windows.Forms;
    3 using System.Threading;
    4 using System.Threading.Tasks;
    5
    6 namespace TaskSchedTest
    7 {
    8 public partial class Form1 : Form
    9 {
    10 private readonly TaskScheduler m_syncContextTaskScheduler;
    11 private CancellationTokenSource m_cts;
    12
    13 public Form1()
    14 {
    15 m_syncContextTaskScheduler =
    16 TaskScheduler.FromCurrentSynchronizationContext();
    17
    18 InitializeComponent();
    19 }
    20
    21 private void button1_Click(object sender, EventArgs e)
    22 {
    23 if (null != m_cts)
    24 {
    25 m_cts.Cancel();
    26 }
    27 else
    28 {
    29 label1.Text = "Operation Running...";
    30 button1.Text = "Cancel Task";
    31
    32 // Define a function to reset the state of the program
    33 // upon task completion.
    34 Func<String, Int32> reset = (String labelText) =>
    35 {
    36 label1.Text = labelText;
    37 m_cts = null;
    38 button1.Text = "Run Task";
    39 return 0;
    40 };
    41
    42 m_cts = new CancellationTokenSource();
    43
    44 // This task uses the default task scheduler and executes
    45 // on a thread pool thread.
    46 var t = new Task<Int64>(() => Sum(m_cts.Token, 200000000), m_cts.Token);
    47 t.Start();
    48
    49 // These tasks use the syn context task schedules and execute
    50 // on the GUI thread.
    51 t.ContinueWith(task => { reset("Result: " + task.Result); },
    52 CancellationToken.None,
    53 TaskContinuationOptions.OnlyOnRanToCompletion,
    54 m_syncContextTaskScheduler);
    55
    56 t.ContinueWith(task => { reset("Operation canceled"); },
    57 CancellationToken.None,
    58 TaskContinuationOptions.OnlyOnCanceled,
    59 m_syncContextTaskScheduler);
    60
    61 t.ContinueWith(task => { reset("Operation faulted"); },
    62 CancellationToken.None,
    63 TaskContinuationOptions.OnlyOnFaulted,
    64 m_syncContextTaskScheduler);
    65 }
    66 }
    67
    68 private static Int64 Sum(CancellationToken ct, Int32 n)
    69 {
    70 Int64 sum = 0;
    71 for (; n > 0; n--)
    72 {
    73 // The following throws OperationCanceledException when Cancel
    74 // is called on the CancellationTokenSource referred by the token
    75 ct.ThrowIfCancellationRequested();
    76 checked { sum += n; }
    77 }
    78
    79 return sum;
    80 }
    81 }
    82 }


    I added the reset function that is used within the lambda expressions in the ContinueWith method calls.  I like this code because it is very succinct and it doesn’t pollute your class namespace with a bunch of private functions that are only used within this one method call.  The performance hit of creating the reset function and the lambda expressions are negligible as well.  The C# compiler actually generates an internal class that contains as method members the lambda expression functions.  You can see this in the image below taken from ildasm.exe.  The compiler generated class is called <>c__DisplayClass7 and the lambda expressions from the ContinueWith method calls are named <button1_Click>b__2, <button1_Click>b__3, and <button1_Click>b__4. You can also see the reset function object as a field.       
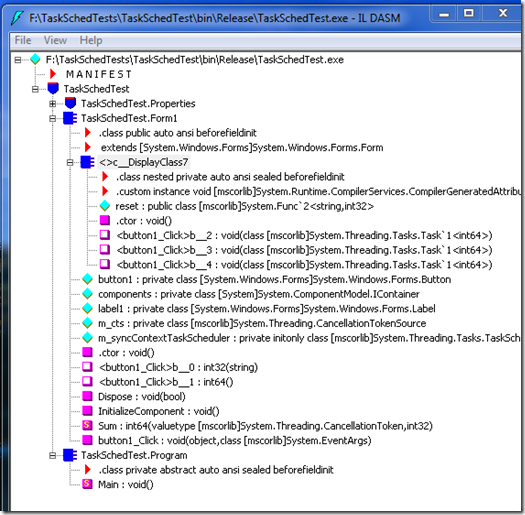


    ildasm1


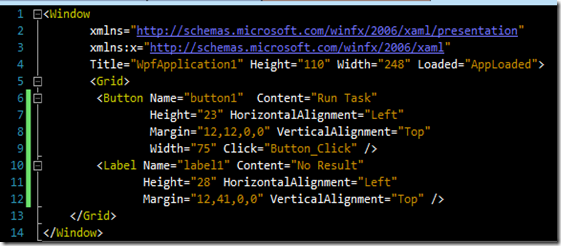
    I liked this sample so much that I wanted to port it to IronPython.  I enjoy Python programming and I have been trying to incorporate IronPython into my work whenever it makes sense to do so.  Being that Python and IronPython are dynamic languages, interfacing the to the .NET Framework can make the syntax cumbersome and not very Pythonic at times.  You must ensure that your IronPython code is using the correct types because the .NET Framework is statically typed. A lot of the time the IronPython interpreter will infer the correct types for you and everything just works.  At other times, the IronPython interpreter does not infer the correct types and you are left with a runtime exception.  For this IronPython example I changed to a Windows Presentation Foundation application, mostly because Visual Studio has a drag and drop WPF editor for IronPython.  Below is the WPF form with XAML and the IronPython code.
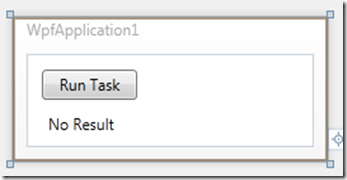


    wpf


    xaml


     1 import clr
    2 clr.AddReference('PresentationFramework')
    3
    4 from System import Func
    5 from System.Windows import Application, Window
    6 from System.Threading import CancellationTokenSource, CancellationToken
    7 from System.Threading.Tasks import (Task, TaskScheduler,
    8 TaskContinuationOptions
    9 )
    10
    11 class MyWindow(Window):
    12 def __init__(self):
    13 clr.LoadComponent('WpfApplication1.xaml', self)
    14 self.cts = None
    15
    16 def AppLoaded(self, sender, e):
    17 self.syncContextTaskScheduler = TaskScheduler.FromCurrentSynchronizationContext()
    18
    19 def Button_Click(self, sender, e):
    20 if self.cts is not None:
    21 self.cts.Cancel()
    22 else:
    23 self.label1.Content = "Operation Running...";
    24 self.button1.Content = "Cancel Task";
    25
    26 # Define a function to reset the state of the program
    27 # upon task completion.
    28 def reset(labelText):
    29 self.label1.Content = labelText
    30 self.button1.Content = "Run Task"
    31 self.cts = None
    32
    33 self.cts = CancellationTokenSource();
    34
    35 # This task uses the default task scheduler and executes
    36 # on a thread pool thread.
    37 t = Task[long](lambda: self.Sum(self.cts.Token, 2000000), self.cts.Token)
    38 t.Start()
    39
    40 NoneType = type(None)
    41 # These tasks use the syn context task schedules and execute
    42 # on the GUI thread.
    43 t.ContinueWith[NoneType](
    44 Func[Task[long], NoneType](
    45 lambda task: reset("Result: {0}".format(task.Result))
    46 ),
    47 CancellationToken.None,
    48 TaskContinuationOptions.OnlyOnRanToCompletion,
    49 self.syncContextTaskScheduler)
    50
    51 t.ContinueWith[NoneType](
    52 Func[Task[long], NoneType](
    53 lambda task: reset("Operation canceled.")
    54 ),
    55 CancellationToken.None,
    56 TaskContinuationOptions.OnlyOnCanceled,
    57 self.syncContextTaskScheduler)
    58
    59 t.ContinueWith[NoneType](
    60 Func[Task[long], NoneType](
    61 lambda task: reset("Operation faulted.")
    62 ),
    63 CancellationToken.None,
    64 TaskContinuationOptions.OnlyOnFaulted,
    65 self.syncContextTaskScheduler)
    66
    67 @staticmethod
    68 def Sum(cancellationToken, n):
    69 sum = 0L
    70 for i in xrange(n + 1):
    71 cancellationToken.ThrowIfCancellationRequested()
    72 sum += i
    73 return sum
    74
    75
    76 if __name__ == '__main__':
    77 Application().Run(MyWindow())


    The most difficult part of this port was getting the .NET Framework generic types correct.  When constructing the initial Task object, I had to use the Task[long] notation for generics with IronPython.  Without the generic parameter, the IronPython interpreter would produce a non-generic Task object and this version of the Task object does not have a Result property as the generic parameter is the result type (line 37).  The nice thing about this line is that I could pass in a Python lambda expression directly and the interpreter infers the proper .NET type, Func[long], in this case.  As you can see later in the code this is not the case.  For those that do not know, generic syntax in IronPython differs from C#. For example: Task<TResult>, in C# you may have Task<Int64> where in IronPython you would write Task[long]. 


    The ContinueWith method calls on lines 43, 51, and 59 gave me the most trouble.  I found that if I tried to pass the lambda expressions directly as the first parameter to ContinueWith, the IronPython interpreter would generate a Func[Task, long] object, when in fact I needed to have Func[Task[long], NoneType] objects.  This is because each of these lambda expressions are called with a single parameter of type Task[long] and they do not have a return value.  In C# this would be void, IronPython it would be NoneType.  To make this work, I had to explicitly create Func[Task[long], NoneType] objects and pass them into ContinueWith.  Luckily I could pass the Python lambda expressions directly to the Func constructor.  I also used the generic notation on the ContinueWith[NoneType] calls to state that they do not have any return value. 


    When I first coded this up I had mistakenly used Func[Task[long], long] objects and ContinueWith[long] method calls.  This is stating that the functions will take a Task[long] parameter (which is correct) and return a long value (which is not correct).  This actually seemed to work, at least until the Finalizer thread ran!  When the Func[Task[long], long] object was called by the framework, an exception was thrown because it was expecting a long value to be returned but received NoneType.  It seemed to work because my function had already executed.  The Finalizer thread would see that a Task had thrown an exception.  It would then pack up this exception into an AggregateException and throw that object. 


    I had fun porting this sample to IronPython and I hope to use it more in my daily work.  Interfacing with the .NET Framework with IronPython can be a very non-Pythonic experience, but this just how it is when you cross the dynamic to static type boundary.